How do I set up telephony in Microsoft Teams (Call2Teams and Call2Teams Go)?
You set up Call2Teams and Call2Teams Go through PBXAdmin, where you simply complete the automated setup.
Setting Up Call2Teams:
To set up Call2Teams, just follow the guide for Call2Teams Go below. If the selected employees have a Microsoft Phone System license, Call2Teams Go will not be activated for them.
See the general licensing requirements for Call2Teams and Call2Teams Go here.
Call2Teams is the new name for Microsoft Teams telephony through Flexfone. The setup, licensing requirements, and functionality remain the same; it has just been migrated to a new backend platform that will drive Teams telephony through Flexfone going forward.
Note: If you have an existing solution with Microsoft Teams telephony, it must be migrated first. In that case, follow the guide below. The only exception is that in step 4 under point 1, you should click on Migrate Setup instead of Update Setup.
Setting Up Call2Teams Go
To set up Call2Teams Go, follow the guide below.
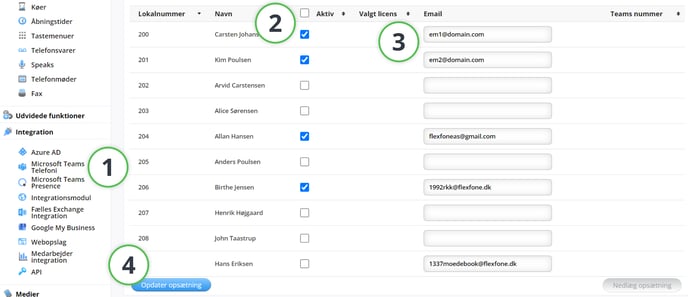
1. First, access PBXAdmin, where you select the Integration option in the left-hand menu.
Then click on Microsoft Teams Telefoni (Microsoft Teams Telephony).
Next, check the box for the employees you wish to activate Call2Teams Go for.
Ensure that an email address is entered for the selected employees and click Opdatér opsætning (Update Setup).

Note: The entered email addresses must be their usernames, not their aliases.
2. A pop-up will appear where you need to accept our terms regarding the setup of Call2Teams Go and then click the Automatiseret opsætning (Automated Setup) button.

Note: Manual setup cannot be used for Call2Teams Go.
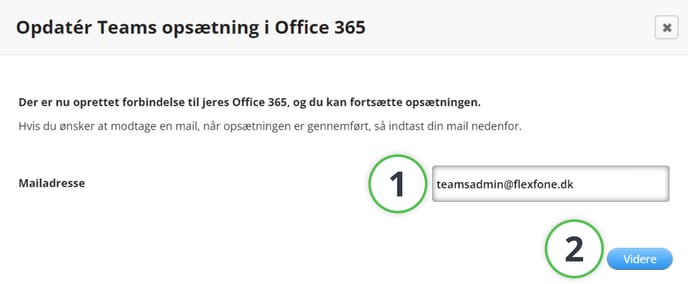
3. You will now need to enter the email address where you want a confirmation sent after the setup is completed. Then click the Videre (Next) button.

4. After the entered information is validated, you will have the option to click the Kør opsætningsopdatering (Run Setup Update) button.

After clicking Run Setup Update, click Opdater system (Update System) in the top right corner.
Within 15 minutes, you will receive an email at the previously entered email address when the setup is complete.
5. Once you have received the confirmation email for the completed setup, proceed to the next step by clicking the Call2Teams Go Admin Modul (Call2Teams Go Admin Module) button, which can also be found in the Microsoft Teams Telephony submenu.

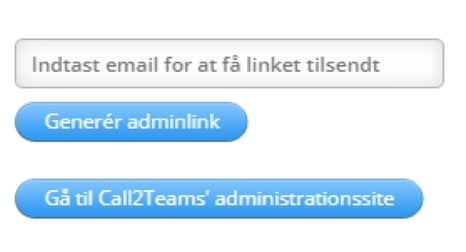
During the initial setup, you need to enter the email address for the global admin user and generate an admin link, which will then be sent to you. If this has already been done, you can proceed directly by clicking Gå til Call2Teams' administrationssite (Go to Call2Teams Administration Site).

IMPORTANT: When generating an admin link or requesting a link, a global admin user must log in.
Note: The admin link and Call2Teams Go Admin Module direct to an external link on the domain https://admin.teams.dstny.com/.
It is important to only click the buttons specified in this guide, as other changes can cause errors in your Microsoft Teams setup.
6. When you enter the portal, select the Services menu at the top, then choose the Teams tab.
Now click the following buttons in this order:
- Services
- Teams
- Authorize Phone App for my organization
- Authorize Phone Bot for my organization
- Sync Now

INFO: During the initial setup, you need to click Sync Now twice. The synchronization is complete when the button is transparent with a green checkmark.
7. Once the synchronization is complete, you can close the external link, and Call2Teams Go is now set up.
Note: If you need to add more employees to Call2Teams Go after the setup is complete, simply do the following in PBXAdmin:
- Check the desired employees as indicated in step 1 of the guide
- Click "Update Setup"
- Click "Update System"
- Click "Sync Now" in the DSTNY portal on the external link
Be aware that a global admin user is only required during the initial setup.
Subsequent changes and synchronizations only require a user with Skype for Business administrator rights.