Manual Setup of Microsoft Teams Telephony
Follow this guide to set up Microsoft Teams Telephony manually:
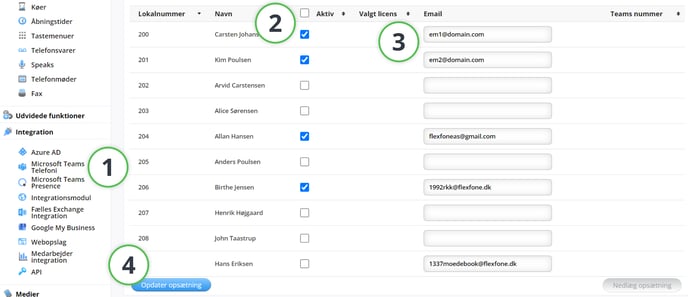
1. Go to PBXAdmin and select the Integration section from the left menu and click on Microsoft Teams telefoni (Microsoft Teams Telephony)
2. Select the employees you wish to activate Microsoft Teams Telephony for by checking the boxes next to their names
3. Ensure that the email addresses for the selected employees are entered
4. Click on Opdatér opsætning (Update Setup)
Accept Terms and Conditions
1. A pop-up will appear where you need to accept the terms and conditions related to the setup of Microsoft Teams Telephony
2. Click on the Manuel opsætning (Manual Setup) button

3. Next, click Kør opsætningsopdatering (Run Setup Update)
NOTE: Manual setup is at your own risk.
4. You will now have the option to enter your email to receive an admin link or click Generate Admin Link.

5. After generating or receiving the admin link via email, you can easily access the Call2Teams admin module by clicking Go to Call2Teams Administration Site.
After this, you need to click on Opdater system (Update System) in the upper right corner of PBXAdmin.
Important: The Call2Teams admin module redirects to an external link at https://admin.teams.dstny.com/.
Only click the buttons specified in this guide, as making other changes may cause issues with your Microsoft Teams setup.
Call2Teams Portal Setup
In the Call2Teams portal, select the Services menu at the top and then the Teams tab.
Click the following buttons in order:
- Services
- Teams
- Disable Sync Enabled

- Click on Save
- Use the domains for further setup in the 365 Admin Center and add the TXT values from the 365 Admin and click Save.

365 Admin Center Configuration
- Add the domains in the 365 Admin Center and assign the TXT values to the Call2Teams Customer Portal.
- Create a new 365 user or change the login domain for an existing user to the PSTN Gateway domain you just created.
- Open a Teams PowerShell terminal and run the cmdlet –
Get-cstenant. - When the PSTN Gateway is present in the SIPDomains list, repeat the process for the second gateway indicated
Direct Routing Initial Setup
Run the following PowerShell cmdlets, replacing the variables below with your PSTN Gateways. In this example, the Voice Routing Policy is named PBX, but you can rename it as desired.
Set-CsOnlinePstnUsage `
-Identity Global `
-Usage @{add='PBX'}

New-CsOnlineVoiceRoutingPolicy `
-Identity PBX `
-OnlinePstnUsages PBX

New-CsOnlineVoiceRoute `
-Name Domain1 `
-Description PBX `
-Priority 0 `
-OnlinePstnGatewayList Domain1 `
-OnlinePstnUsages PBX `
-NumberPattern .*

New-CsOnlineVoiceRoute `
-Name Domain2 `
-Description PBX `
-Priority 1 `
-OnlinePstnGatewayList Domain2 `
-OnlinePstnUsages PBX `
-NumberPattern .*
$rule = New-CsVoiceNormalizationRule `
-Parent Global `
-Name PBX `
-Description PBX `
-InMemory `
-Pattern '^(\*[\*\d]+|[1-9]\d{0,5})$' `
-Translation ‘$1’ `
-IsInternalExtension $false

Set-CsTenantDialPlan `
-Identity Global `
-NormalizationRules @{ "add" = $rule }
User Provisioning
In the manual setup, use the Call2Teams portal to add phone numbers and create the SIP registrations you intend to associate with Teams users. Add a phone number to a Teams user and assign the Voice Routing Policy. To connect a Teams user to a phone number and enable them for calling, run the two cmdlets.
Grant-CsOnlineVoiceRoutingPolicy `
-Identity “Email Address” `
-PolicyName PBX
Set-CsPhoneNumberAssignment `
-Identity “Email Address” `
-PhoneNumber 'PSTN Number’ `
-PhoneNumberType DirectRouting
If the Teams user attempts to make a call, it will route to the Call2Teams service, and if the phone number is associated with a SIP registration in the portal, the call will be forwarded to PBX/PSTN.
Remove Users from the Service
To remove users from the service, uncheck the box next to the user in PBXAdmin.
- Go to the Integration section in the left menu, click on the Microsoft Teams telefoni (Microsoft Teams Telephony) submenu, and uncheck the boxes next to the employees you wish to deactivate Microsoft Teams Telephony for.
- Click on Opdatér opsætning (Update Setup) and then Opdater system (Update System) in the upper right corner of PBXAdmin.
- To remove all configuration applied to a Teams user, run the following cmdlets using Teams PowerShell:
Remove-CsPhoneNumberAssignment -Identity [email] -PhoneNumber "PSTN number" -PhoneNumberType DirectRouting
Grant-CsOnlineVoiceRoutingPolicy -Identity [email] -PolicyName null