- Under Køer (queues), you can create queues, edit queues, prioritize the call sequence of queues, and subscribe/unsubscribe phones to queues.
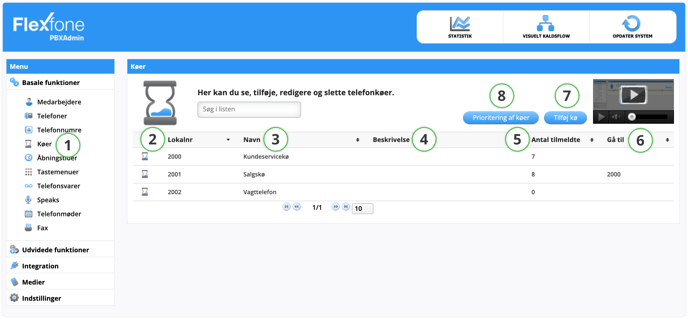
Function Description 2. Lokalnummer (Local number) Here you can see the local number of the queue. This is the number phones should log onto. E.g., "2*2000" to log onto the Customer Service queue. 3. Navn (Name) The name of the queue could be the location or department, for example. 4. Beskrivelse (Description) Can be used for additional identification of the queue. (E.g., 'Customer Service Aarhus'). 5. Antal tilmeldte (amount of registered) See how many agents are logged into the queue. 6. Gå til (Go to) Here you can see if it's selected where to 'Go to' if specific criteria are met, which is selected during the setup of the queue. 7. Tilføj kø (Add queue) Here you can create a new queue that can be used in the company's call flow. 8. Prioritering af køer
(Prioritization of queues)
Here you can view and activate the prioritization of your different queues. Read more about this function in the Prioritization of Queues section.
To edit a queue, click on the queue you want to edit. A new window will appear containing information about the selected queue, as shown below.
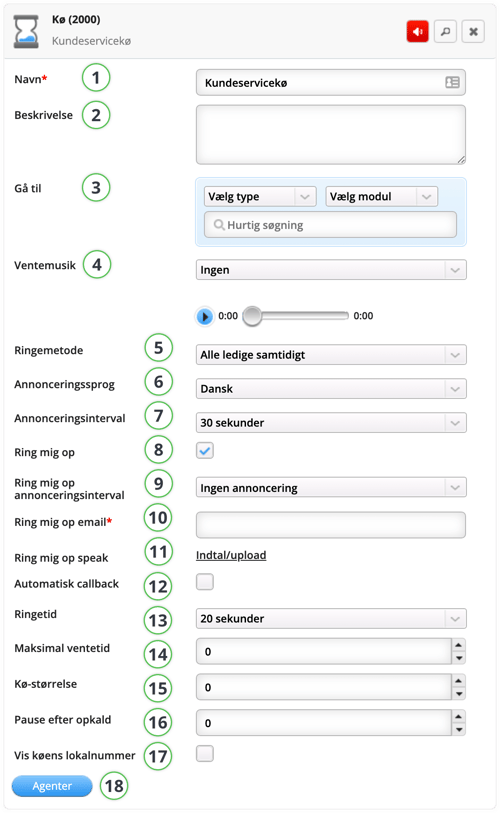
| Function | Description |
| 1. Navn (Name) | The name of the queue could be location or department, for example. |
| 2. Beskrivelse (Description) | Can be used for additional identification of the queue. (E.g., 'Customer Service Aarhus'). |
| 3. Gå til (Go to) |
Here you can choose what the queue should forward to if the maximum wait time is reached, queue size, or if no one is registered in the queue. You don't need to select a type to look up a local number. This can be useful if you have many local numbers that are named the same but have different functions. |
| 4. Ventemusik (Hold music) | Here you can select which hold music you want for a queue. You can have different hold music for different queues. |
| 5. Ringemetode (Ringing method) |
|
|
6. Annonceringssprog (Announcement language) |
Here you can choose the language for queue position announcements. Options include Danish, English, Norwegian, Swedish, and German. |
|
7. Annonceringsinterval (Announcement interval) |
Here you can choose how often a person is informed of their position in the queue. |
| 8. Ring mig op (Call me back) | Enable/disable the option to be called back while waiting in line. |
|
9. Ring mig op annonceringsinterval (Call me back announcement interval) |
Specify how often the 'Call me back' message should be announced. |
|
10. Ring mig op E-mail (Call me back email) |
Specify the email address to send 'Call me back' notifications to. |
| 11. Ring mig op speak (Call me back speak ) | Record a message, e.g., "We are currently very busy, if you want to be called back press #, otherwise please wait for the next available employee." NOTE: # is the activation key, so it should be clear in the message. When you press #, Flexfones' 'Call me back' message will play, asking for an 8-digit phone number and ending with #. If you press #, the call will also end. |
| 12. Automatisk callback (Automatic callback ) | Enable/disable the option to be called back when it's your turn in the queue. |
|
12. Callback annonceringsinterval (Callback announcement interval) |
Here you must specify how often the automatic callback message should be announced (only visible when Automatic callback is enabled). |
| 13. Ringetid (Ring time) | Here you can choose how long each employee will be called before moving on to the next. |
| 14. Maksimal ventetid (Maximum wait time) | Here you can determine how long someone can wait in the queue before being forwarded to the "Go to" option. The time is determined in seconds. |
| 15. Kø-størrelse (Queue size) | Here you can determine the maximum number of people in a queue. If the maximum number is reached, calls will be forwarded to what is determined under "Go to". |
| 16. Pause efter opkald (Break after call) | Here you can determine how long a break someone should have after ending a call. NOTE: If you are assigned in multiple queues and wish to have a pause after calls across these queues, this must be activated in PBXAdmin by going to the menu Indstillinger (Settings) > Generelle indstillinger (General Settings) > check the box Pause efter opkald på tværs af køer (Pause after calls across queues) > click Gem (Save) and then Opdater system (Update System). |
|
17. Vis køens lokalnummer (Show queue's local number) |
If you want queue calls to your mobile phone to display with the queue number, check this box. |
|
18. Agenter (Agents) |
Here you can see which phones are logged into the queue. You can also log phones in and out via this menu. Under "Agent" choose which phone you want in the queue. |
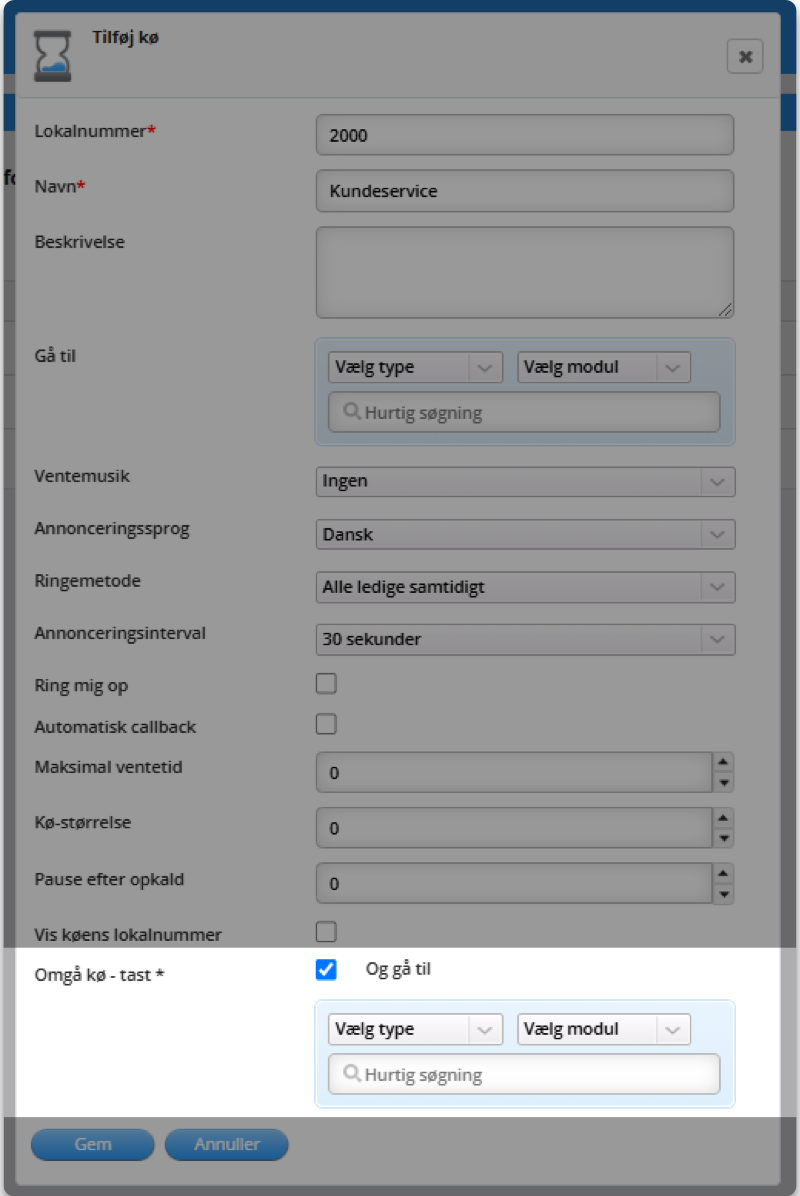
Bypass Queue Function
If you want the option to go directly to a selected "go to" (gå til) field and thereby bypass the queue function, this is also possible by pressing *. The field is activated as shown below and can point to a different "go to" (gå til) field than the queue.
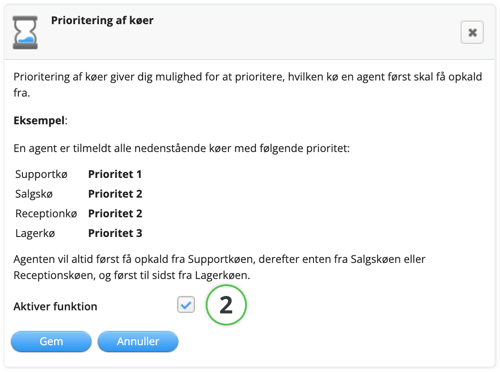
Manage Queue Prioritization
If, for example, you are registered to a support queue, which has 1st priority, and a sales queue, which has 2nd priority, you will always first receive calls from the support queue with 1st priority.
When there are no more calls in the support queue, you will then receive calls from the sales queue, which has 2nd priority. If the 1st priority queue is never emptied, you will thus never receive calls from the 2nd priority queue.
To activate the function, you must do the following on PBXadmin.dk:
- Under the Køer (Queues) menu item, click on the Prioritering af køer (Queue Prioritization) button.
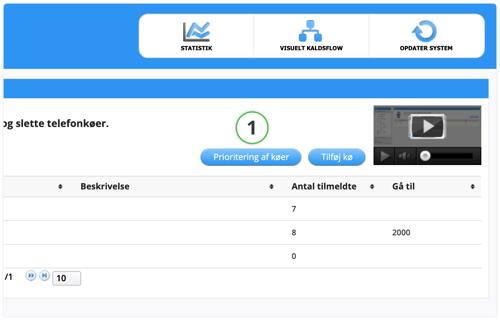
- Place a checkmark next to Aktiver funktion (Activate function) in the dialog box and press Gem (Save).
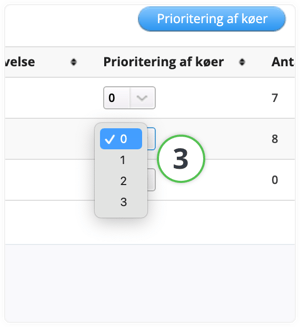
- Beside each queue, you can now choose the prioritization.
🔄 OPDATER SYSTEM
Remember to click on OPDATER SYSTEM (UPDATE SYSTEM) in the top right corner to publish your changes.