| Column Name | Description |
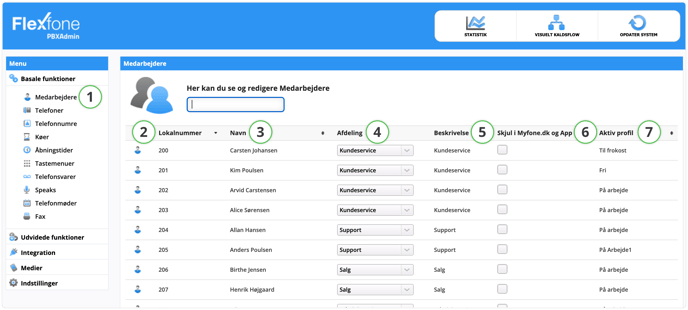
| 2. Lokalnummer (Local Number) | The local number is the number by which an employee can be recognized. If you want to call the employee, you have to dial the local number. The local number will be shown under contacts in Myfone, among other places. |
| 3. Navn (Name) | Name of the employee. |
| 4. Afdeling (Department) | In the dropdown menu, you choose the department the employee belongs to. If you run with departmental billing, it's also determined here. To view this column, one or more departments must be set up under Indstillinger (Settings). |
| 5. Beskrivelse (Description) | Can be used for extra recognition of the employee. (E.g., "Warehouse worker in Århus") |
|
6. Skjul i Myfone.dk og App (Hide in Myfone.dk and app) |
Here, you have the option to choose whether the employee should be visible or not on Myfone or in the app. This column is only visible if it is enabled in Generelle indstillinger (General settings) under Indstillinger (Settings). |
| 7. Aktiv profil (Active Profile) | This field shows the employee's current profile. Read more about profiles under Myfone. |
When you want to edit an employee, click on the employee you want to edit and a a new window will open. The window contains information about the selected employee as shown below.
Generelt (General)
Under the Generelt (General) tab you can view and edit general user information.

| Function | Description |
| 1. Lokalnummer (Local number) | The local number is the number by which an employee can be recognized. If you want to call the employee, you have to dial the local number. The local number will be shown under contacts in Myfone, among other places. |
| 2. Navn (Name) | Name of the employee. |
| 3. Beskrivelse (Description) | Can be used for extra recognition of the employee. (E.g., "Warehouse worker in Århus") |
| 4. Banke på (Call waiting) |
If the employee wants Call Waiting on his devices, this box must be ticked. |
|
5. Blokér for udgående kald (Block outgoing calls) |
Here, you can block the employees from making outgoing calls. Calls to 112, 114, etc., can still be made. If you tick the box, you will be able to select individual numbers that can still be called. You do this by pressing Åbn for enkelte numre (open for individual numbers). |
Telefoner (Phones)
Under the Telefoner (Phones) tab you can see all phones associated with an employee, or you can add a new phone. To add a phone to an employee, it must first be set up under Phones.
If the phone you want to link is already linked to an employee, you must first delete the link on the employee who has the phone and then add it to the employee who should have the phone.
1. To link a phone, search for the item under Hurtig søgning (Quick Search), click on the item, and then click on the green plus and click Gem (Save).
2. You delete a phone/phone number link by pressing the red minus and then pressing Gem (Save).

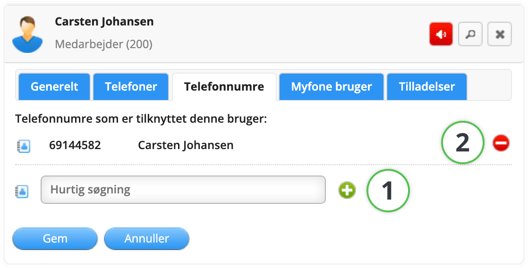
Telefonnumre (Phone Numbers)
Under the Telefonnumre (Phone numbers) tab, you can view all phone numbers associated with a user, or you can link a new number. To add a phone number to an employee, it must first be set up under Phone numbers.
If the phone number you want to link is already linked to an employee, you must first delete the link on the employee who has the phone number and then add it to the employee who should have the phone number.
1. To link a phone number, search for the item under Hurtig søgning (Quick Search), click on the item, and then click on the green plus and click Gem (Save).
2. You delete a phone number link by pressing the red minus and then pressing Gem (Save).
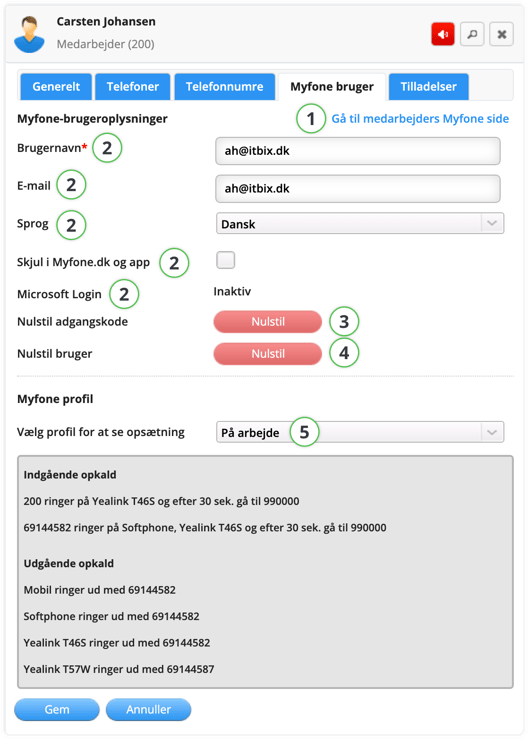
Myfone bruger (Myfone User)
If you want to view the active profile or view the current profile settings, you can do this under the Myfone bruger (Myfone user) tab. Here, you can also directly log in to the employee's Myfone via Gå til medarbejderes Myfone side (Go to the employee's Myfone page).
| Function | Description |
| 1. Gå til medarbejders Myfone side (Go to the employee's Myfone page) |
Here, you have a quick shortcut directly to the employee's Myfone page. |
|
2. Brugernavn, E-mail, Sprog , Skjul i Myfone.dk og app, Microsoft login |
Here, you can customize user information. |
| 3. Nulstil adgangskode (Reset Password) | Here, you can generate a new password for the user. The new password will be sent to the email associated with the Myfone user. If a mobile phone is linked, the code will also be sent here. |
| 4. Nulstil bruger (Reset User) | Here, you can reset the user. When the Myfone user is reset, all saved data on the user is deleted. |
| 5. Myfone profil (Myfone profile) | Here, you can change the user's active Myfone profile. To view the user's various profiles, select them in the dropdown menu. |
| 6. Vælg profil for at se opsætning (Select a profile to view the settings) |
Here, you can switch between the employee's various profiles and get a quick overview of the settings made below. (This is only an overview and does not change their profile). |
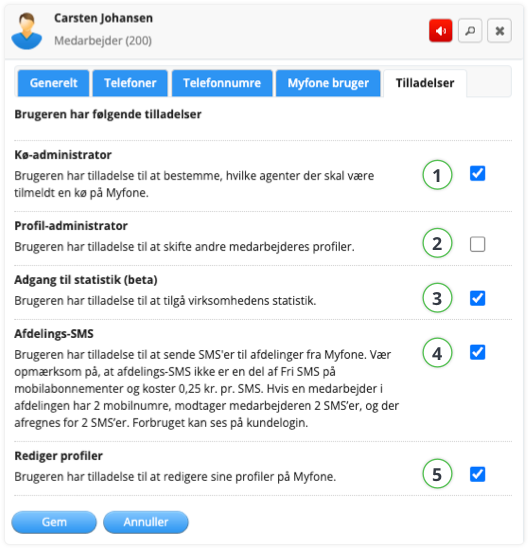
Tilladelser (Permissions)
Under the Tilladelser (Permissions) tab, you can select which permissions the respective user should have.
| Function | Description |
| 1. Kø administrator (Queue administrator) | Allows the employee to add/remove agents from queues. |
| 2. Profil administrator (Profile administrator) | Allows the employee to change other employees' profiles for them. |
| 3. Adgang til statistik (Access to statistics) | Gives the employee permission to access the company's statistics. |
| 4. Afdelings SMS (Department SMS) | Allows the employee to send SMS messages to departments. Read more about Department SMS. |
| 5. Edit profiles | Gives the employee permission to edit calling profiles on Myfone. |
🔄 OPDATER SYSTEM (UPDATE SYSTEM)
Remember to click OPDATER SYSTEM in the upper right corner to publish your changes.